Is SearchApp.exe a Virus? SearchApp.exe is a Windows system process integral to the operating system’s search functionality, used in the Start menu, taskbar, and File Explorer. It is usually not a virus, but its authenticity can be verified by checking the digital signatures under its properties. High CPU load can be fixed by terminating the process, disabling Fast Boot, or repairing system files. Disabling or deleting it is possible, though not recommended due to its usefulness. To fully disable it, administrative commands can be used in Command Prompt before deletion. However, users are generally advised against removing this helpful feature.
Understanding the SearchApp.exe Process in Windows 10 and 11
When managing tasks on your Windows 10 or Windows 11 computer, you may occasionally stumble upon the SearchApp.exe process within the Task Manager. This executable is commonly found on both operating systems and is typically characterized by its low impact on system resources, activating sporadically and briefly. However, users have reported instances where the SearchApp process is found to exert a moderate or significant strain on the system’s performance.
Today’s article delves into the nature of the process, exploring the reasons behind its potential to cause high loads on your PC, and providing insights into whether you can—and should—disable or delete this process.
Is SearchApp.exe a Virus or a System Process?
It’s understandable for users to be concerned about unknown processes; however, It is, in fact, a legitimate Windows system process. It is crucial in powering the operating system’s search functionality, accessible through various interfaces such as Explorer and the Start taskbar.
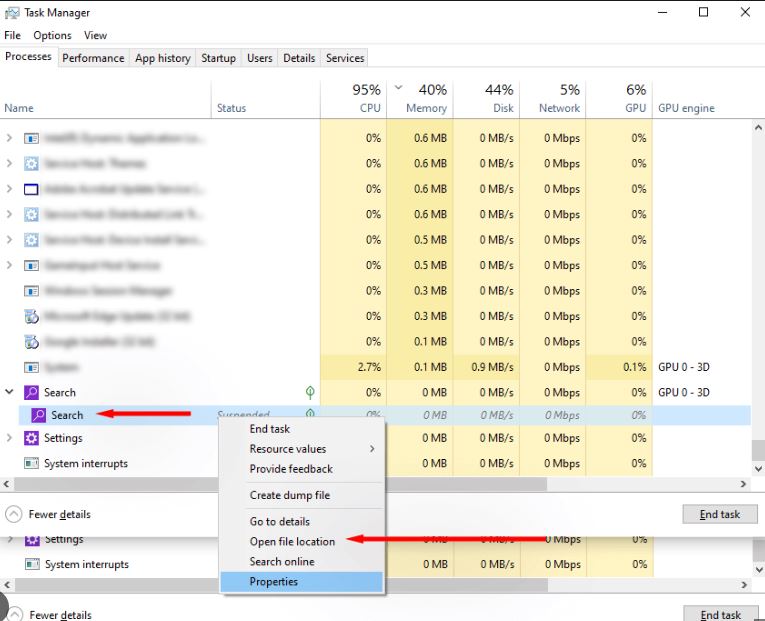
Upon discovering this process in the Task Manager, your first instinct might be to question its authenticity. Here is how you can verify that the SearchApp.exe is a genuine component of your system:
- Click on the SearchApp.exe process in Task Manager and select “Open file location”;
- The legitimate executable should be located in the directory %windir%\SystemApps\Microsoft.Windows.Search_cw5n1h2txyewy;
- Right-click on the file and choose “Properties”;
- Navigate to the “Digital Signatures” tab and review the signatures listed.
If the signatures include “Microsoft Windows,” you can rest assured you’re dealing with a certified system service. However, if you still harbor concerns about the security of your computer and data, running a system scan using your choice of antivirus software is prudent.
Why Does SearchApp.exe Overload Your PC and How to Fix It?
Under typical circumstances, It should not be causing any significant load on your PC. It lies dormant most of the time, springing into action only when the system processes search queries. Should you notice this process burdening your computer’s performance, consider the following steps:
– Terminate the SearchApp.exe process via the Task Manager;
– Disable the Fast Boot feature in your power settings;
– Perform a scan to repair potentially damaged system files.
The latter two suggestions warrant a more detailed explanation:
How to Disable Fast Boot
To disable the Fast Boot feature, which can sometimes cause issues with system processes:
1. Press WIN+R to launch the “Run” dialog box;
2. Enter control and confirm with ENTER;
3. Adjust the view to “Large icons” or “Small icons”;
4. Navigate to “Power Options → Choose what the power buttons do”;
5. Select “Change settings that are currently unavailable”;
6. Deselect “Turn on fast startup (recommended)”;
7. Save the adjustments and close all windows;
8. Restart your PC to apply the changes.
Check the Integrity of the System Files
If system file corruption is suspected, perform the following:
1. Open the “Run” dialog box using WIN+R;
2. Type cmd and initiate it with admin privileges using CTRL+SHIFT+ENTER;
3. Issue the command sfc /scannow in the Command Prompt and execute it with ENTER;
4. Await the completion of the scan and the subsequent restoration of any corrupted files;
5. Close the Command Prompt and reboot your PC.
How to Disable/Delete SearchApp.exe
If you are determined to disable the SearchApp process, it questions why one would opt to disengage such a nifty and useful feature that simplifies and accelerates system usage. Nonetheless, here’s how to proceed:
1. Open the “Run” dialog box using WIN+R;
2. Enter cmd and open it with admin rights using CTRL+SHIFT+ENTER;
3. Execute the following commands in sequence:
“`
takeown /f %windir%\SystemApps\Microsoft.Windows.Search_cw5n1h2txyewy /r /d y
icacls %windir%\SystemApps\Microsoft.Windows.Search_cw5n1h2txyewy /grant Administrators:F /t
ren %windir%\SystemApps\Microsoft.Windows.Search_cw5n1h2txyewy\searchapp.exe searchapp.old.exe
“`
4. After running these commands, terminate the SearchApp process in Task Manager;
5. Access the SearchApp.exe file location and delete it as you would any other file.
In summary, Howfixes this article aims to clarify the nature and function of the SearchApp.exe process in Windows 10 and 11, along with guiding how to manage and potentially disable or remove it. While we advise against removing such an integral system feature, ultimately, the choice is left to the user’s discretion. If questions remain concerning this topic, please engage with us in the comments section below.
Safety Search and AI: Bing AI For Chrome Bing Unchained