The expected Windows 11 has started to enter our lives. Today I will share my article about How to rename PC on Windows 11.
Although it seems simple, there are differences compared to other Windows operating systems. You can find it in detail in our article.
How to rename PC on Windows 11 If you need to learn how to change your username in Windows 11, here is your guide. Although changing the username in Windows 11 is straightforward, some people need help to reach the username setting option in the operating system. This is common for many people. Since Windows 11 is a new operating system with significant changes in the user interface, a simple guide with relevant screenshots is needed to explain it.
We are here to help you solve your problem when changing your username in Windows 11. Below we have an easy method to change the account name without any issues. The exact process can be done in Windows 10 and Windows 8 similarly.
You will learn how to rename your laptop, desktop, and tablet using Windows 11.
How to Rename PC on Windows 11
How to rename PC on Windows 11 is a simple process and can be done through the Settings app. Here’s a step-by-step guide on how to rename your PC:
- Open Settings: Click the “Start” button on the taskbar, then click on the gear icon to open the Settings app.
- Go to System Settings: In the Settings app, click “System” from the list of available options.
- Select About: Click “About” from the left side menu in the System settings.
- Click on “Rename this PC”: There is a “Rename this PC” option under the “Device specifications” section. Just click it.
- Enter the New Name: A new window will pop up, allowing you to enter the new name for your PC. Type in the desired name for your PC.
- Click Next and Restart: Press the “Next” button after entering the new name. Windows will then prompt you to restart your PC to apply the changes. Click on “Restart now” to complete the process.
- Confirm the New Name: Once your PC restarts, the new name will be applied, and you can confirm the change by going back to the About section in the System settings.
Rename PC via Control Panel
How to rename PC on Windows 11 The steps you need to do to rename your Windows 11 computer are as follows: HowFixes
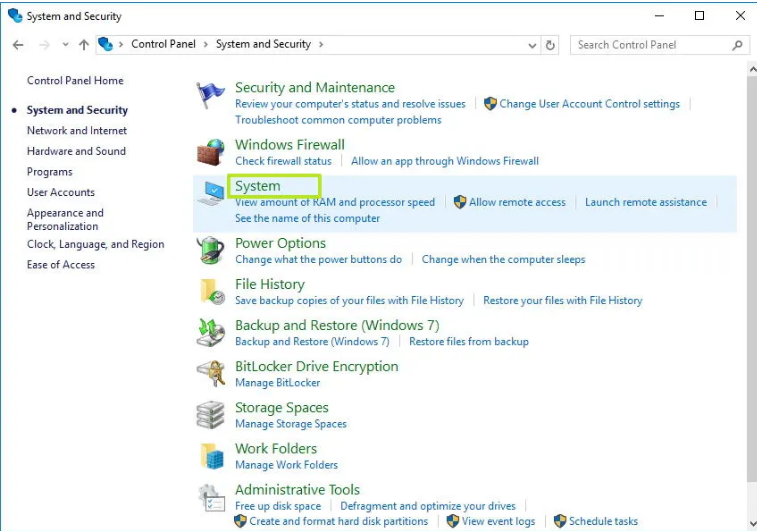
- Open the Control panel on your computer.
- On the page, click “System and Security”.
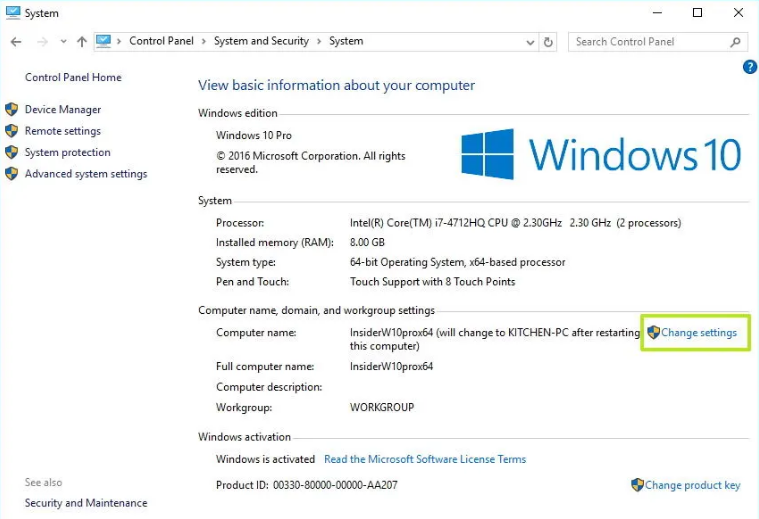
- At the bottom of the open page, select the “Allow remote access” option.
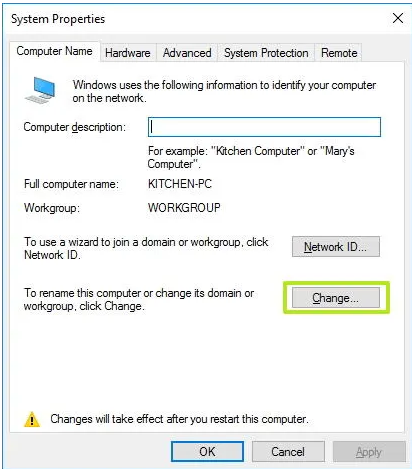
- Then select Computer Name.
- From here, select “Change”.
- Reaffirm the name of the Windows 11 computer.
- Saying “OK” will be sufficient, and then, after pressing the shutdown button, selecting “Restart Your Computer” will cause your computer to appear with its new name.


Rename PC via Command Prompt
- Launch Start.
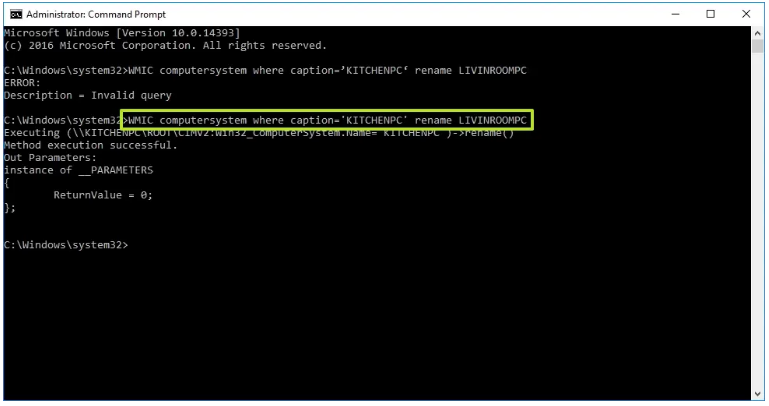
- Enter “Command Prompt” into the search box, right-click the first result, and choose “Run as administrator.”
- To view the device name, enter the command after typing it:
hostname- To change the name of your Windows 11 computer, use the following command and hit Enter:
WMIC computersystem where caption='CURRENT-PC-NAME' rename 'NEWPCNAME'
- To restart the pc, enter the command after typing it:
shutdown -r -t 00

Rename PC via PowerShell
- Launch Start.
- Right-click the first result from your search for PowerShell and choose “Run as administrator.”
- To view the current PC name, enter the command after typing it:
Rename-Computer -NewName "NEW-PC-NAME"
- To restart the pc, enter the following command and then type enter:
Restart-Computer


NOTE:
If you do not keep your computer version current, you may encounter some problems. Windows 11 is designated as the new version. If you do not update your Windows 11 computer, some of the issues you may encounter will be problems with network discovery, and you will not be able to take advantage of some of its features.

After the update, you can use your previously created MicroSoft credentials. On the positive side, it will allow you to use its detections and features when device discovery or hardware changes are made. How to rename a PC on Windows 11
Video
Conclusion
How to Rename PC on Windows 11? Giving your PC a personalized name on Windows 11 is a simple and functional task that helps you distinguish your device from others on the network. The process can be accomplished in just a few steps through the Settings app. Following the step-by-step guide in this article, you can effortlessly rename your PC to a name that suits your preference or organizational requirements. Embrace the opportunity to personalize your computing experience with a distinct and memorable name for your Windows 11 PC.
ChatGPT, which has been popular recently, is an example plugin. I recommend you try it.