how to update Powershell in Windows 11? upgrade PowerShell 5.1 to 7 PowerShell is an incredibly useful tool from its predecessor, the command prompt MSDOS. Tools like PowerShell receive bug fixes and new features over time. Here’s how to check your PowerShell version in Windows before updating.
What is the PowerShell
Microsoft created PowerShell, a strong and adaptable command-line shell and scripting language. It is commonly used for automating tasks, managing system configurations, and performing administrative tasks on Windows operating systems. PowerShell provides a wide range of commands and utilities that allow users to interact with and control their computer systems, making it a valuable tool for IT professionals, system administrators, and developers.
One of the key features of PowerShell is its ability to work with objects, making it more flexible and script-friendly compared to traditional command-line interfaces. PowerShell scripts can be used to streamline repetitive tasks, perform system maintenance, and automate various operations, which can significantly enhance productivity and efficiency.
PowerShell is particularly popular in enterprise environments for tasks such as system management, network administration, and server configuration. It also supports the automation of tasks across a variety of Microsoft products and services.
In summary, PowerShell is a command-line shell and scripting language that plays a crucial role in Windows system administration and automation, making it an indispensable tool for those working with Windows operating systems.
How to Check Your PowerShell Version?
You only need one command to check your version of PowerShell. Open a new Terminal window and make sure you have a PowerShell tab open.
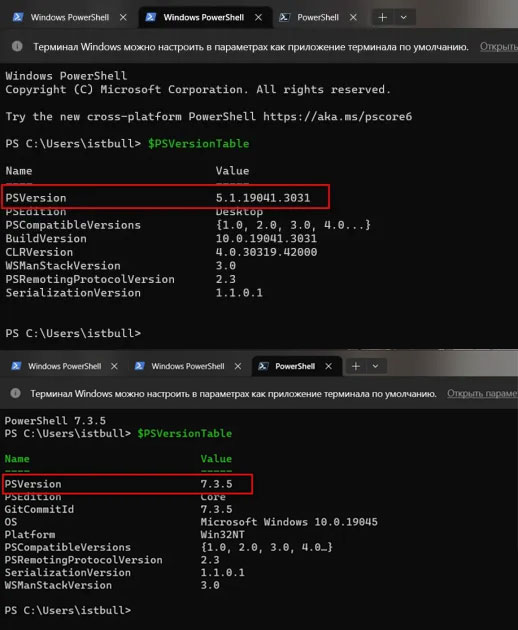
$PSVersionTableType or paste the above command and press Enter. You will see something very similar to the image below, but your version numbers may be very different.
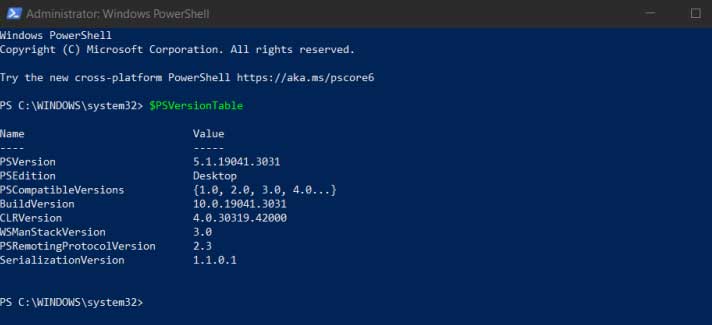
PowerShell in this example is quite outdated – version 5.1.19 and the latest stable version at the time of writing is version 7.3.5.
Microsoft maintains a changelog on GitHub detailing what bug fixes and features are added with each new release. Luckily, updating PowerShell on Windows is as easy as it gets, so you don’t really need to bother updating the latest features.
How to Update PowerShell in Windows 11? Upgrade PowerShell 5.1 to 7
How to Update PowerShell in Windows 11? The easiest way to update PowerShell is from the command line using Winget.
Winget allows you to download and install some programs from a central program repository instead of manually following an installer. If you are familiar with these systems, they are very similar to Debian-based Linux distributions.
How to Update PowerShell in Windows 11 with Command Line
To download and install the update, open a PowerShell tab in Terminal. At the command line, type or copy and paste the following command and press Enter. Using Microsoft’s GitHub source, this command will download and install the most recent version of PowerShell:
winget install --id Microsoft.Powershell --source winget
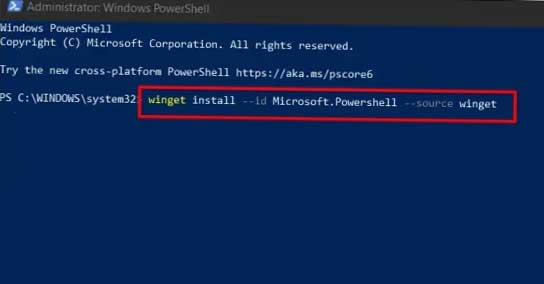
When the download and installation are finished, you should close all your Terminal windows.
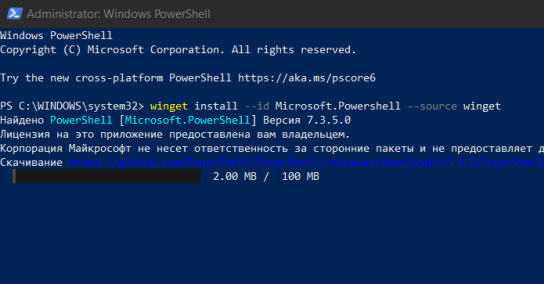
NOTE:
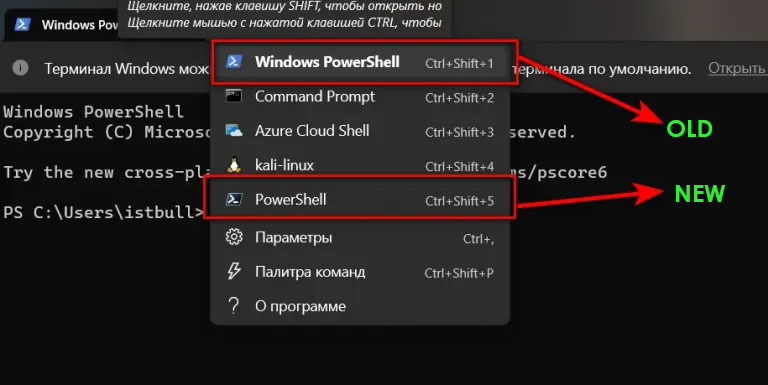
How to Update PowerShell in Windows 11 – upgrade powershell 5.1 to 7 It is important to note that PowerShell 7.x does not completely replace PowerShell 5.x when you install it on your system. PowerShell 7.x is installed in a separate location and both versions of PowerShell remain available on your computer.
When you start Terminal after installing PowerShell 7.x, you will see that you now have an additional PowerShell profile. HowFixes
PowerShell is significantly different from Command Prompt and much more powerful. If you need to spend a significant amount of time modifying Windows 10 or Windows 11 with a command line interface, it’s worth investing some time in learning to use PowerShell.
Manually Updating PowerShell
If you’ve downloaded the .msi file from the official website, follow these steps to manually update PowerShell:
- Double-click the downloaded .msi file to start the installation process.
- Follow the on-screen instructions. Make sure to select “Add to PATH” during installation to make PowerShell easily accessible.
How to Add Powershell to Context Menu in Windows 10 with Settings
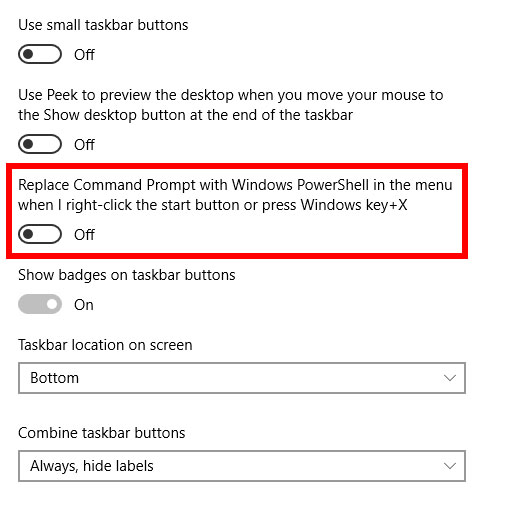
Replace Command Prompt with PowerShell and Vice Versa in Windows 10 11 With the new update, there are many user-friendly changes in Windows 10, one of my favorite features is that we can replace the Command Prompt in the Quick Launch menu with PowerShell.
- To do this we go to the settings menu
- From the Settings Menu, click on Personalization
- We activate “Replace the Command prompt with Windows PowerShell in the menu when I right-click on the Start button or press Windows Key + X” by going into the Tasks Bar area.
- That’s all, PowerShell will now replace the Command prompt.
Replace Command Prompt with PowerShell and Vice Versa in Windows 10
Replace Command Prompt with PowerShell and Vice Versa in Windows 10
Conclusion
Keeping PowerShell up to date in Windows 11 is essential for maintaining a secure and efficient system. By following the steps outlined in this guide, you can ensure that your PowerShell version is current, benefitting from the latest features and enhanced security. Whether you’re an IT professional or a Windows enthusiast, a well-maintained PowerShell is a valuable tool.